

message board home
 4/21/2025 9:44:34 AM
 Reply
or ReplyNewSubject
Reply
or ReplyNewSubject
Section 23: Gun Collecting Subject: Expensive pistol, So-so photos Msg# 1224027
|
||||||
|
Outstanding mini-treatise one how to do it right! I do many of those things you mentioned but have not tried a couple of them--bouncing the light off styrofoam is clever as heck! I do use color-temperature-rated bulbs in standard reflectors. I mount mine from above from left, right, and slightly behind, but it is a task for me to avoid all reflections. I do have a light tent and should use it more often. I usually don't have problems with depth of field. I also use a cable release on my tripod mounted camera, just to avoid any movement.
I think one of the biggest problems these auction sellers have is that many of them actually use a phone camera. I know those have come a long way, but they still don't have the control possible with a...well, camera. My opinion. Thanks again, Allan! |
||||||
|
|
||||||
|
For reference, the above message is a reply to a message where: Those pictures could illustrate a study on how not to take and present gun pictures. Based on nothing but that photography I might offer $500 for the gun, just because I'd love to have one that old and wouldn't care if it was a junker. I didn't see any military markings on the gun but the pictures were so poorly focused I might have missed them. Anyway, I don't think it has the excuse of being an arsenal rebuild. I'm with you on its condition and I am not surprised there are no bids on it. As for the photography, I thought the pictures were in black and white until I spotted some washed-out brown on the grip panels. When shooting a dark subject (or any subject) you want the background to be somewhere between as dark and slightly darker than the subject. Shooting against a white background, the camera's exposure system is going to read the extra brightness from all that white and will normally stop the lens opening down enough to make the subject appear too dark. In order to brighten the subject up to something close to normal you have to overexpose the shot. A lot. If you are using a real camera you may be able to set it for spot exposure metering rather than letting it try to average the brightness of everything in the entire frame. There will be a certain spot in the viewfinder that you put on the subject and take your exposure measurement right there. On such cameras you put the metering spot over the part of the subject you think looks right and then press the shutter release halfway down. The camera locks the exposure reading on that spot and ignores the rest of the picture you see in the viewfinder. Then, you move the camera as necessary to frame the whole picture. When it looks properly composed you press the shutter the rest of the way down and take the shot. It's a bit like staging the trigger on a double-action pistol or revolver. I think the two biggest problems in these photos are lighting and light balance. Judging by reflections on the gun I think the lighting consists of three bare fluorescent bulbs in some hardware store fixture. Fluorescent bulbs are about the worst for photography. With film you needed special film or a special screw-on lens filter. With digital photography you have to choose the correct light balance setting. Either way, the picture will not look as good as one taken with proper lighting. I use a set of three light stands with standard reflectors and incandescent bulbs of a certain temperature. I can set the light balance feature on my camera to the exact light temperature of the bulbs. I can also move the light stands around until I can't see the round bulbs reflected from flat surfaces on the gun. Sometimes positioning the lights for zero reflection is impossible and then I either put up with the smallest amount of reflection I can arrange or I diffuse the light. I diffuse it either by putting the subject in a translucent white tent and shining the lights through the tent material or I bounce the light off white panels (pieces of white Styrofoam insulation) or use umbrella reflectors attached to the light stands. You can also go outside and shoot under cloudy bright conditions with natural diffusion. Another serious problem with these photos is poor focus. Sometimes this is done intentionally to hide visible imperfections in the subject and sometimes it's just poor equipment or plain ignorance. Proper focus requires a lens with enough depth of field to include all of the gun you are photographing. Depth of field is the distance between the closest and farthest away points in a photo that are in focus. The smaller the F-stop setting on a lens, the wider its depth of field and the more of the subject gun that will be in sharp focus. Unfortunately, it takes a certain amount of light to get a proper exposure and the smaller the F-stop the longer the shutter has to be open to let in the necessary quantity of light. It's like filling a water bucket from a faucet: you can crack the faucet open just a little bit and it takes a long time to fill or you can crank it wide open and fill it in a short time. Every shooter and photographer knows you can't hold the human body perfectly still and body motion will ruin both gun accuracy and photo sharpness. You need the smallest F-stop available to get the maximum depth of field and you can't hold the camera still enough for a long enough time to get a proper exposure so you need to mount the camera on a tripod to hold it perfectly still. If you don't have good enough equipment to manually adjust your depth of field you can help yourself greatly by laying the gun flat on your chosen background and holding your phone or real camera precisely at a right angle to it. This makes the closest and farthest parts of the gun the smallest possible distance apart and therefore requiring the smallest depth of field. I don't know what the pictures in the ad were taken with but in some of them none of the gun was in focus. There is another aspect to digital photography that the seller of this gun could not control and that is the website's DPI limit. The more Dots Per Inch the site can display, the more detail you can see and the sharper the focus will appear. When you enlarge the images in this gun's ad, DPI is so badly reduced that there simply aren't enough pixels to show detail. In gun photography, background color and general makeup are critical. This gun's ad plainly shows that white is not an acceptable choice for a color picture, and if you are going to use a washed-out photo you don't want to surround it with a thick black frame with yellow characters on it. You want to use a color that is close to the same "darkness" as the gun. By "darkness" I mean if you converted the color photo to a black and white print, how close in shades of gray would it appear compared to the gun? If the background shows a pattern of some sort, make sure it isn't so busy that it distracts your eye from the gun. Here's an example of my attempted description of color darkness and background pattern: 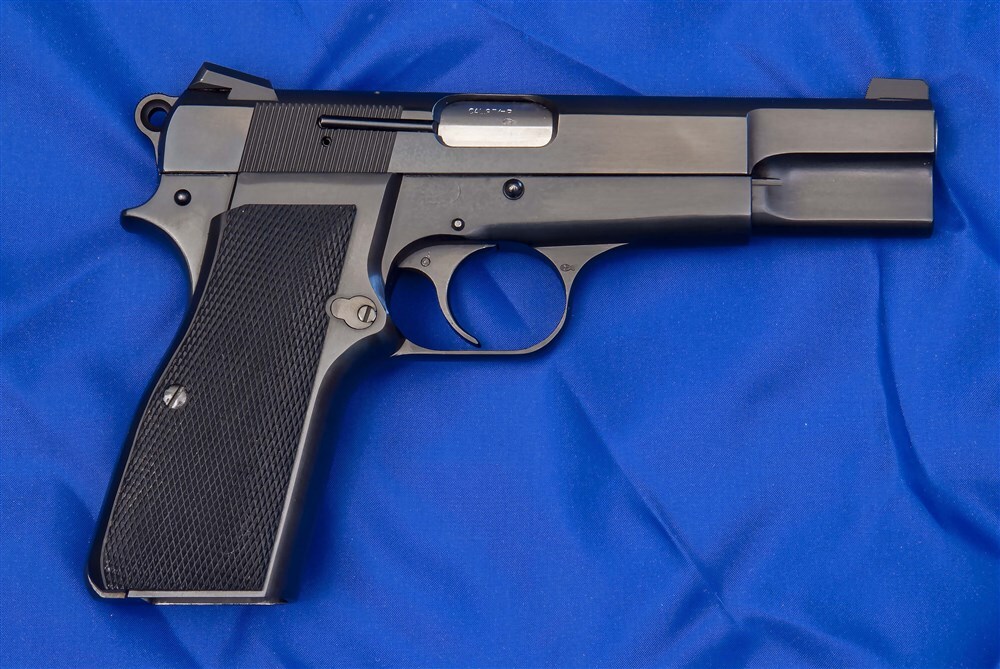 With help from Photoshop you can almost make a gun float above the background: 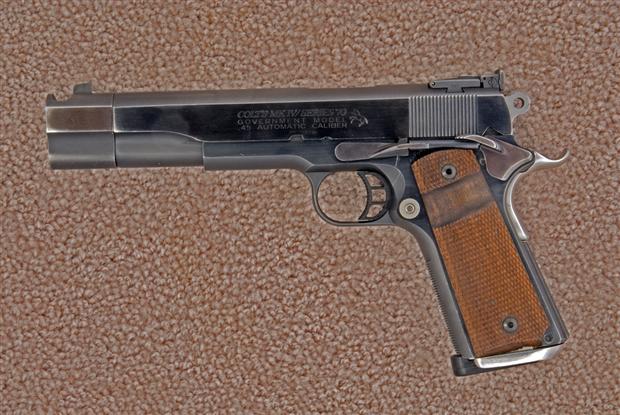 Using creative lighting you can angle a small spot light to bring lettering and small details to life: 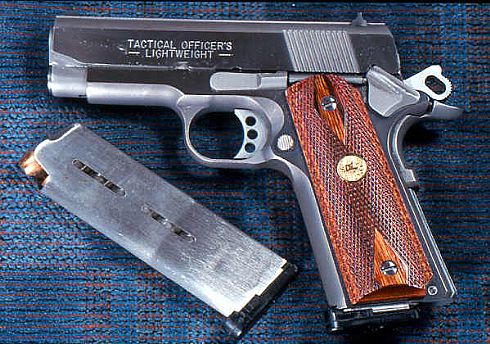 |


